How to Set a File to Read Only
When you lot need to ensure a file isn't inverse nether any circumstances in Windows, it's fourth dimension to make information technology read-only. Setting a file as read-only or write-protecting a file prevents any changes whatever. If y'all don't know how to set files equally read-only and need to, yous're in the right identify!
In this tutorial, you're going to learn how to set and remove the read-merely attribute in File Explorer, the command-line (cmd), and via PowerShell!
Let's get going.
Prerequisites
This post will exist a hands-on tutorial. If yous'd similar to follow forth, be certain you take the following:
- A Windows PC. This tutorial will employ Windows 10 and Windows PowerShell v5.1.
- A file to toggle the read-only aspect on. This tutorial will use a file located at C:\Shared\readme.txt.
How to Make a File Read-But (and Writable) in File Explorer
At that place are a few different ways to fix a file equally read-merely but let's start out this tutorial past first covering how to get in happen via Windows File Explorer.
The read-only aspect is stored as a metadata property rather than in the content of the file. The property can be seen through Windows File Explorer.
Assuming that you're on the desktop of your Windows PC:
1. Open Windows File Explorer and navigate to the folder that stores the file you'll be working with (C:\Shared) in this instance.
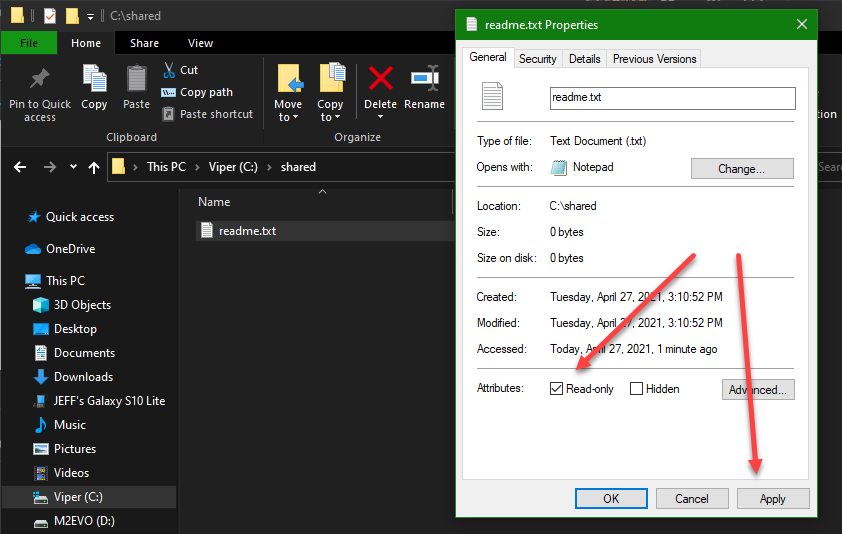
2. Right click the file and click Properties to open the file's Properties box. This box contains diverse metadata nearly that particular file such as size, when it was created, modified, etc. It as well has file attributes.
Click the read-simply checkbox in the Attributes group to write-protect the file or set it as read-merely, click Utilize to assign the read-only aspect, and OK to close the dialog box.
Similarly, to remove the read-only attribute from the file, uncheck the Read-only checkbox.
How to Make a File Read-Simply (and Writable) via Command Line
File attributes aren't just exposed via File Explorer. Yous can besides manipulate file attributes including the read-just attribute via the command line. To do and then, you must use a command called attrib.
i. Open up up a control prompt (cmd.exe).
2. Navigate to the binder the file is in.
3. Run attrib with no parameters. The attrib command will immediately look for all files in the working directory and render all files and the enabled file attributes. Yous can see below the readme.txt file does not have the read-but attribute enabled.

4. Now, run attrib to assign the read-only attribute. The +r parameter is key here. This parameter tells Windows to set the read-only attribute on the file.
5. Run attrib once again with no parameters to verify the read-just attribute was practical. Y'all tin at present run across in the screenshot below the R label shows up indicating the read-only aspect has been practical write-protecting the file.

Similarly, to remove the read-only attribute employ the
-rparameter.
How to Make a File Read-Just (and Writable) with PowerShell
If you're not a fan of the GUI or the command prompt or want to employ accept a little more ease of control, await no farther than PowerShell! Let's now learn how to make a file read-only with PowerShell!
- Open Windows PowerShell.
2. Run the Get-Item cmdlet providing the path to the file you're toggling the read-only attribute on. The Attributes property returned contains each file attribute that'south currently enabled.
go-item -Path "c:\shared\readme.txt" | format-tabular array name, attributes 
Using the
Format-Tablecmdlet is not necessary but by doing so, tells PowerShell to brandish only the two properties you're interested in in an easy-to-view format (Proper nameandAttributes)
3. Assign the read-simply attribute by calculation the ReadOnly attribute to the Attributes property equally shown below.
## Capture the file object in the $file variable $file = Become-Particular -Path "c:\shared\readme.txt" ## Non to overwrite the existing attributes, create a new array containing ## the current file attributes while adding the ReadOnly attribute and assign ## that assortment every bit the new value of the Attributes property $file.Attributes = @($file.Attributes,"ReadOnly") 
4. Now, view the Attributes holding of the $file object and you'll meet that you've now practical the ReadOnly attribute to the file while maintaining whatsoever existing attributes that existed on the file beforehand. You can also run Get-Item once again to view the aforementioned results.

To remove the ReadOnly attribute from the file, follow the exact same approach merely this time set the value of the Attributes property to Normal eastward.g. $file.Attributes = "Normal".
Conclusion
Y'all should now know how to set a file every bit read-only and vice versa. Setting a file as read-merely is meant to prevent accidental changes. But know that, setting a file every bit read-only is not necessarily a security measure and does not foreclose access to the file or someone from simply changing the attribute themselves.
Armed with this new knowledge of protecting files from beingness accidentally overwritten, practise you accept any files you'd like to protect?
Source: https://adamtheautomator.com/how-to-make-a-file-read-only/
0 Response to "How to Set a File to Read Only"
Post a Comment